System Requirements

Minimum System Requirements
- Intel® Core™ 2 or better / AMD am3+ or better
- 4GB RAM*
- 4GB drive (HDD/SSD/M2/USB)
* For ETH mining on RX Vega 56, RX Vega 64, Radeon VII, RX 5700 you will need 6GB RAM
Recommended System Requirements
- Intel® Core™ i3-3220 3.3 GHz / AMD FX-6300 3.5 GHz
- 8GB RAM
- 8GB SSD drive

Recommended BIOS settings
Update the BIOS to the latest version!
- Disable CSM (for motherboards on the AMD platform, first disable CSM, save the settings, reboot, and only then configure everything else)
- Set the boot mode to UEFI
- Enable 4G decoding*
- Set the PCI Mode parameter to Auto**
- Turn on the integrated graphics and set the memory allocation value for it as small as possible
- Set the boot priority for HDD/SSD/M2/USB depends on your OS storage***
- Disable virtualization
*AMD A-series APU processors do not support 4G decoding
**if there are problems with starting a large number of GPUs, set the PCI Mode value to Gen1 or Gen2 and disable unused resources (audio outputs, etc.)
***When using HDD/SSD/M2, set the SATA operation mode to AHCI
-
AMD
Radeon RX 400 (460, 470, 480)
Radeon RX 500 (550, 560, 570, 580, 590)
Radeon RX Vega (Vega 56, Vega 64, Radeon VII)
Radeon RX 5000 (5500, 5500 XT, 5600, 5600 XT, 5700, 5700 XT, RX 5700
XT 50th Anniversary Edition)
Radeon RX 6000 (6600, 6600 Laptop, 6700, 6700 XT, 6800, 6800XT, 6900 XT)
-
ASIC
Antminer (S9, L3+, D3, T9+, Z9/Z9-Mini, Z11, S17, T17)
Innosilicon A9 ZMaster
-
Watchdogs
OpenDev Pro2, OpenDev Lite, Watchdog.in.ua, ChinaWatchdog, Finedar v.5, Finedar v.9 (more...)

List of supported hardware:
-
Nvidia
GeForce 10 GTX (1050, 1050 Ti, 1060, 1070, 1070 Ti, 1080, 1080 Ti)
GeForce 10 Mining Edition (P106-090, P106-100, P104-100, P102-100)
GeForce 16 GTX (1650, 1650 Super, 1660, 1660 Super, 1660 Ti)
GeForce 20 RTX (2060, 2060 Super, 2070, 2070 Super, 2080, 2080 Super, 2080 Ti)
GeForce 30 RTX (3060, 3060 Laptop, 3060 Ti, 3070, 3070 Laptop, 3070 Ti, 3080, 3080 Ti, 3090)
GeForce 40 RTX (4070, 4070 Ti, 4080, 4090)
CMP HX (30 HX, 40 HX, 60HX, 90 HX, 170 HX) -
Autofans
Donnager, Coolbox, Cryptone, Clamp54 (more...)
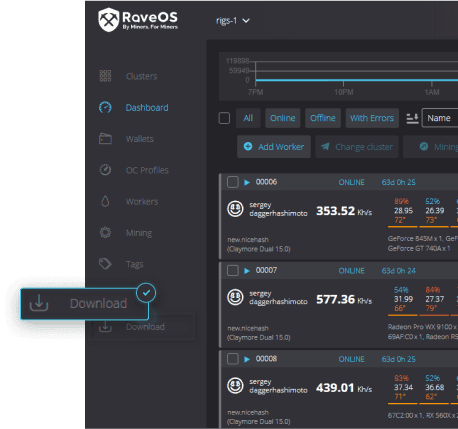
- Download (mirror) and unpack image.
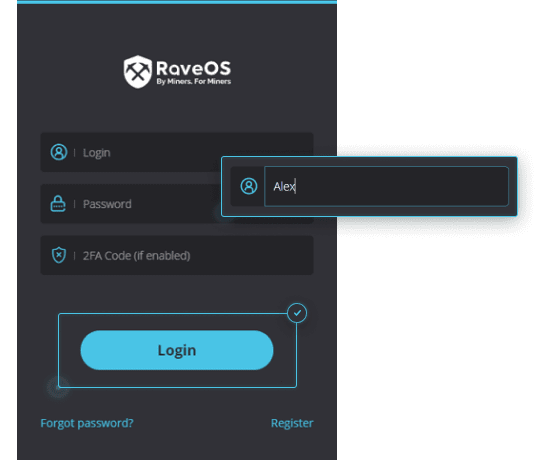
- Log in (accounts.raveos.com)
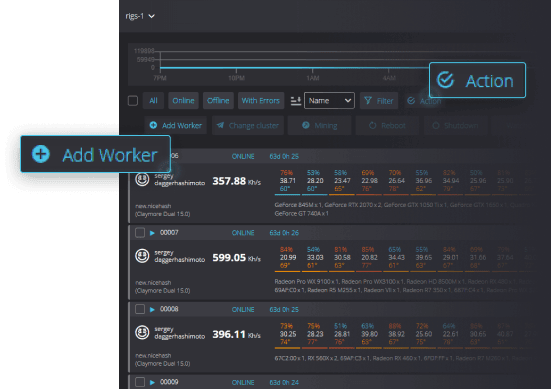
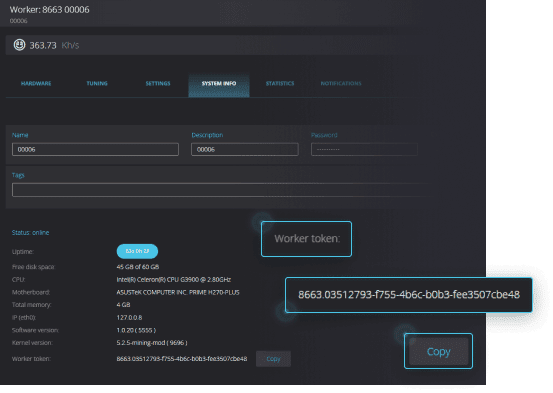
- Add new worker on the "Dashboard" or in "Workers" menu.
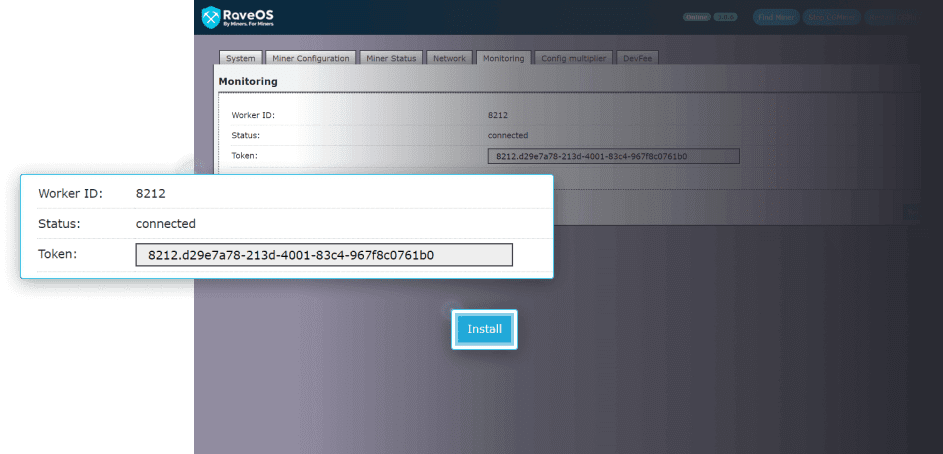
- Go to the System Info tab of the added worker and copy the Worker’s token.
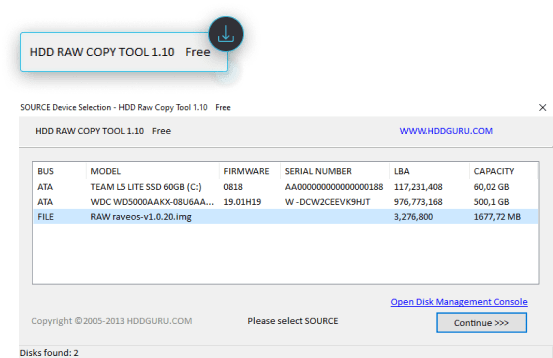
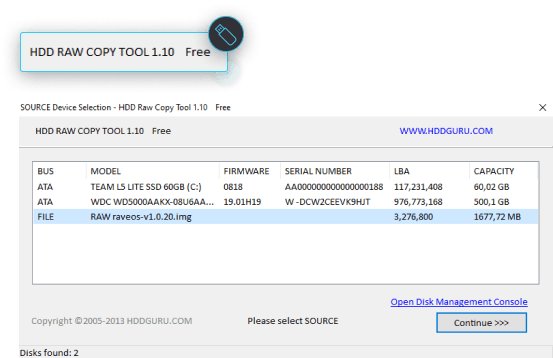
- Download HDD Raw Copy Tool flashing utility.
- Flash the OS image to your media using the HDD Raw Copy Tool.
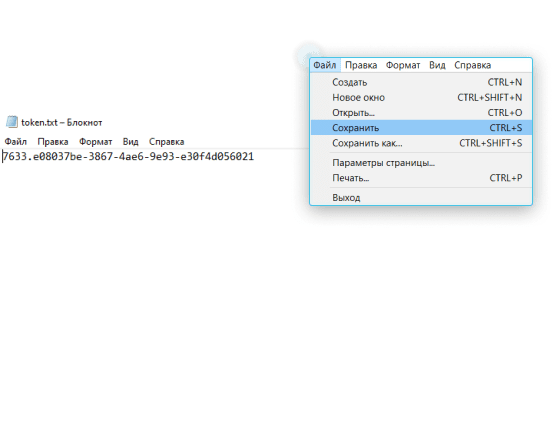
- Open OS_DISK:/config/token.txt file, paste Worker’s token and Save it. To manage your network settings use OS_DISK:/config/network.txt (explanation in Network settings section).
- Plug this OS drive into your worker.
Prepare your OS drive

Network settings
Open OS_DISK:/config/network.txt file to manage network settings. You can leave the file empty if you are using a wired network with DHCP server Structure and description of file contents:
                                {

                                        "net_type": "W",
                                        // Network type: E - for Ethernet, W - for Wireless


                                        "net_mode": "S",
                                        // Network mode: D - for DHCP, S - for Static IP


                                        "ip": "0.0.0.0",
                                        // IP-address with CIDR support (for static IP)


                                        "mask": "255.255.255.255",
                                        // netmask (optional)


                                        "gw": "0.0.0.0",
                                        // gateway (for Static IP)


                                        "dns": "0.0.0.0, 1.1.1.1, 2.2.2.2",
                                        // comma-separated list of DNS servers (optional)


                                        "ssid": "wifinetwork",
                                        // WIFI [B]SSID (optional)


                                        "psk": "12sd78SR##21!",
                                        // WIFI key (optional)


                                        "driver": "wext"
                                        // WIFI driver (nl80211 or wext). Default wext (optional)

                                }
network.txt example for wireless network with DHCP server:
{"net_type":"W","net_mode":"D","ssid":"SSID","psk":"PSK_KEY"}
network.txt example for ethernet network without DHCP server:
{"net_type": "E","net_mode": "S","ip": "0.0.0.0","mask": "255.255.255.255",
                                "gw": "0.0.0.0","dns": "0.0.0.0, 1.1.1.1"}
System Requirements
Minimum System Requirements
- Windows 7 or newer / Linux / MacOS
- Intel® Core™ 2 or better / AMD am3+ or better
- 4 GB RAM
- 4 GB storage (HDD / SSD / M2 / USB)
Recommended System Requirements
- Windows 10 or newer / Linux / MacOS
- Intel® Core™ i3-3220 3.3 GHz / AMD FX-6300 3.5 GHz
- 8 GB RAM
- 8 GB SSD storage
List of supported equipment:
- Antminer E9/E9 PRO, L7, S19/S19 PRO, T19
- Whatsminer M3, M20S, M30S+/M30S++
- iPollo V1 Mini, V1H
- Iceriver KAS KS0
Currently, only original firmware is supported. The list of supported models and firmware will be continuously expanded.
To request support for ASIC models and third-party firmware, please email us at
[email protected] with the subject "ASIC HUB".


Installation
To use ASIC Hub, your PC must be on the same local network as your ASIC devices.
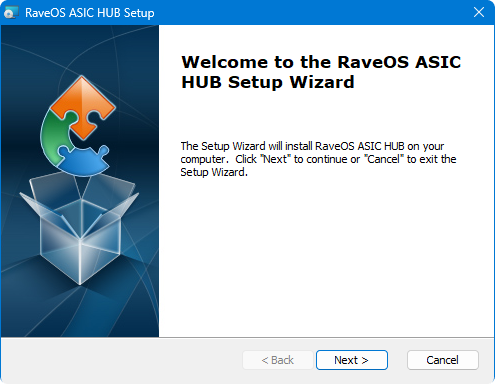
- Download the ASIC Hub for RaveOS installer file.
- Run the installer and follow the instructions.
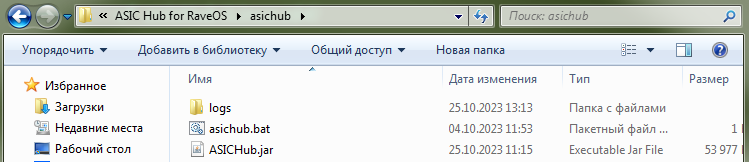
- After installation, navigate to the installation path, usually C:\ASIC Hub for RaveOS\asichub, and run the asichub.bat file
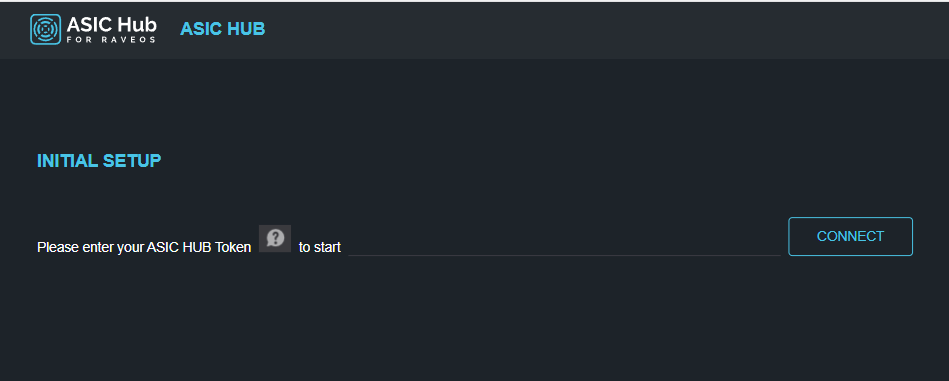
- This will open a browser window at http://localhost:10081/ , which will be used to access the ASIC Hub interface
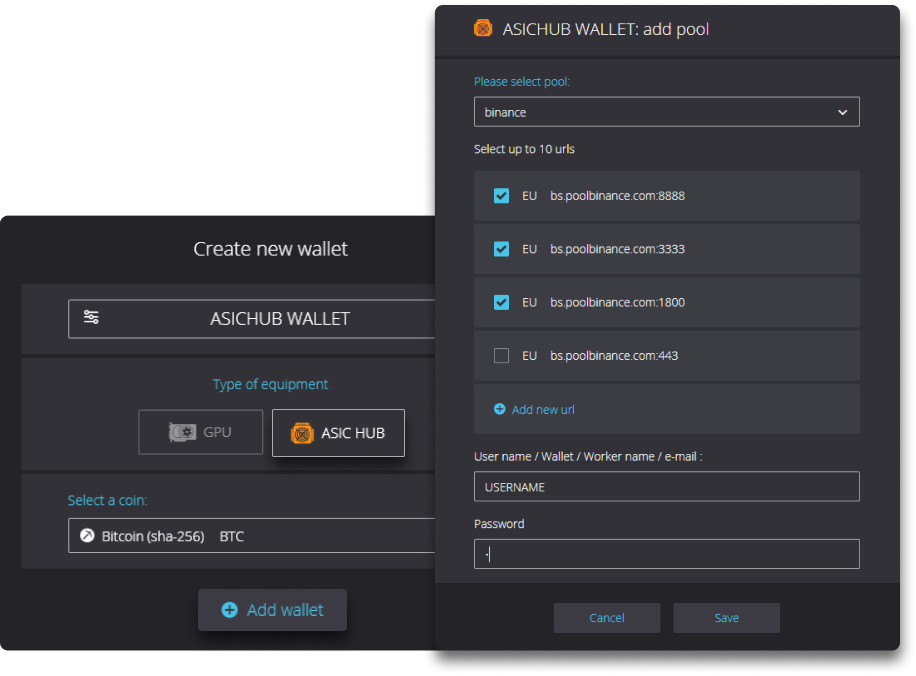
- Log in to your RaveOS account on the website and go to the "Wallet" section in the left sidebar menu. Click on "Add Wallet" and enter the wallet name. Select the equipment type as "ASIC HUB" and choose the desired coin from the list. Click "Add Wallet." Next, select the mining pool, choose the preferred pool URLs, and enter your login credentials for pool authorization. Click the "Save" button.
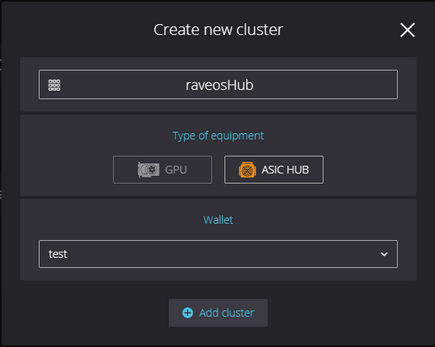
- Go to the "Clusters" section in the left sidebar menu.
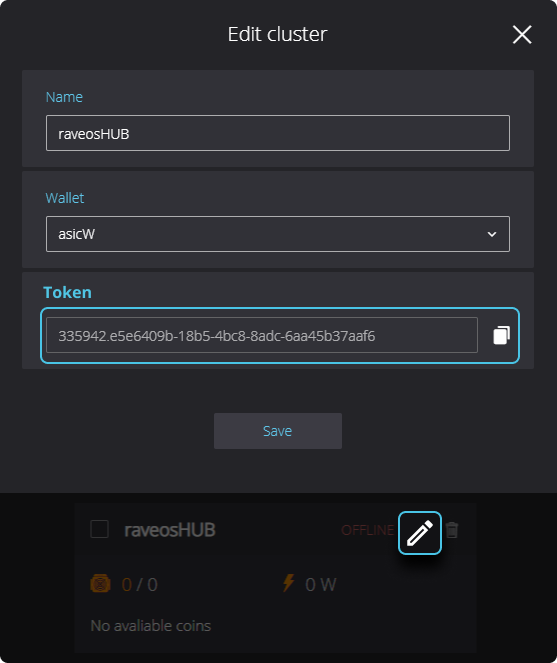
- Click on "Add Cluster" and enter a name for your cluster. Select "Type of equipment: ASIC HUB" and choose the default wallet for ASIC Hub. Click on the pencil icon ("Edit Cluster") and copy the Token.
- Return to the ASIC Hub interface at http://localhost:10081/ , paste your token, and click "Connect".
- Start adding your ASICs to ASIC Hub by clicking on "+Add new Devices".
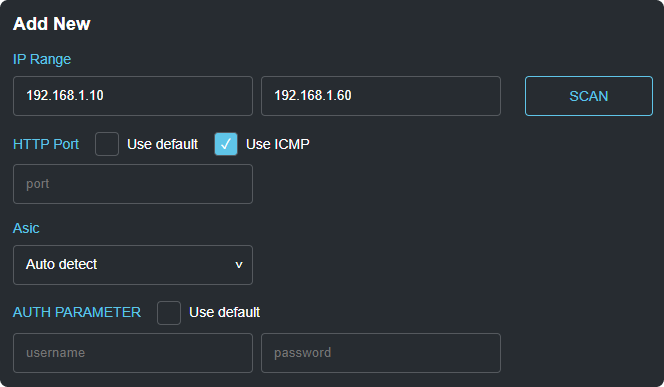
- Enter the IP address range for scanning ASICs in the format 192.168.1.1. Optionally, you can specify the port for accessing the ASIC's web interface, as well as the login and password for the ASIC (if different from the default). Click "SCAN".
- Select the desired ASIC(s) from the list by checking the boxes and give them names. The "Apply hub config" checkbox applies the default ASIC Hub wallet. If not activated, the pool and wallet settings will remain unchanged. Click "Add".
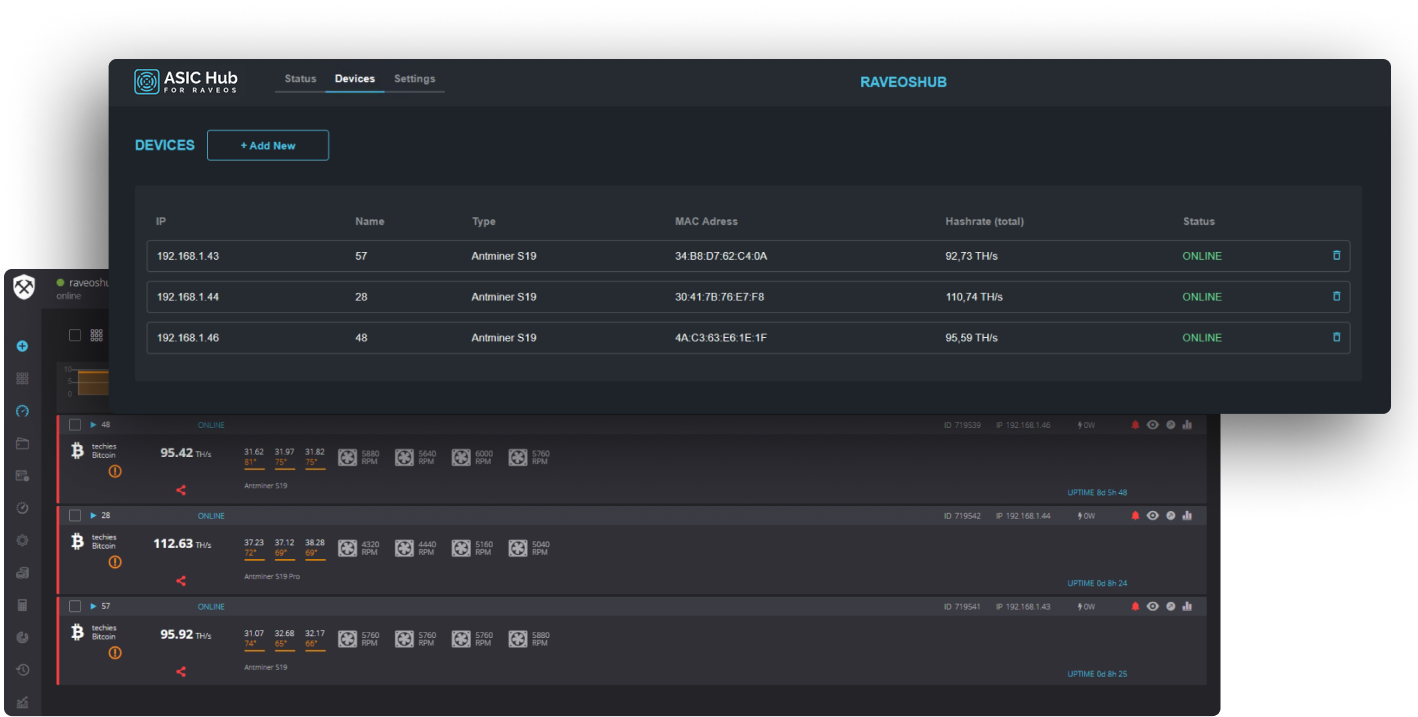
- The added ASICs will appear on the "Devices" tab and on the dashboard in your RaveOS account.


ASIC Hub Functionality Description
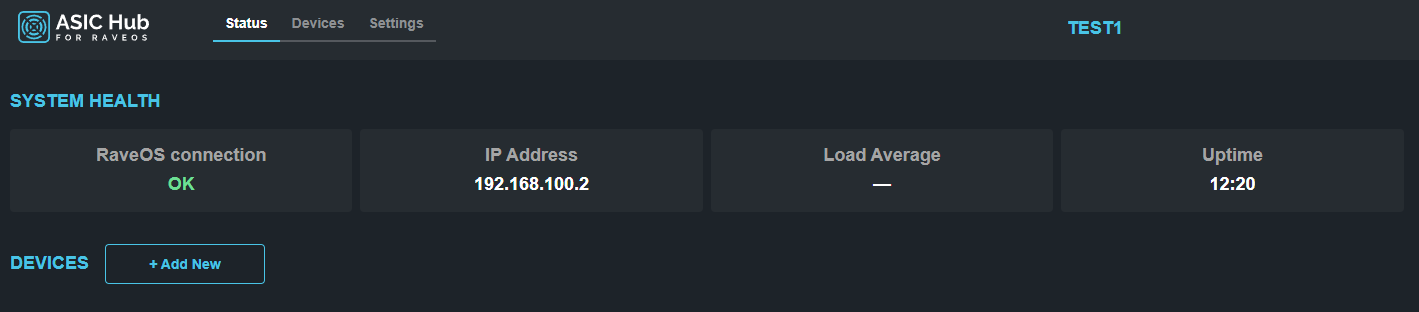
"STATUS" Tab
- RaveOS connection: Connection status
- IP Address: ASIC Hub server's IP address
- Load Average: Average system load
- Uptime: System uptime

"DEVICES" tab
Add new: Allows you to add new devices.
- IP Range: Specifies the range of IP addresses to scan in the network
- HTTP Port: The port of the ASIC interface. If the port hasn't been changed and the checkbox is not activated, the default port will be used
- USE ICMP: Enabled by default. Determines whether to use the ICMP protocol for connection
- Asic: Allows you to select a specific ASIC model for scanning
- Scan: Initiates the scanning process
- The checkbox allows you to select devices to add
- After scanning, the discovered devices will be displayed below
Information about the discovered devices includes: IP address, name, MAC address, model.
- Apply hub config: If enabled, it uses the default ASIC Hub wallet from the "Clusters" menu. If not enabled, the pool and wallet settings on the ASIC will not be changed
- Add: Adds the selected devices to ASIC Hub
After adding, the ASICs will be displayed on the "Devices" tab. It shows basic information and the status of the device, and there is also an option to remove a device from ASIC Hub.
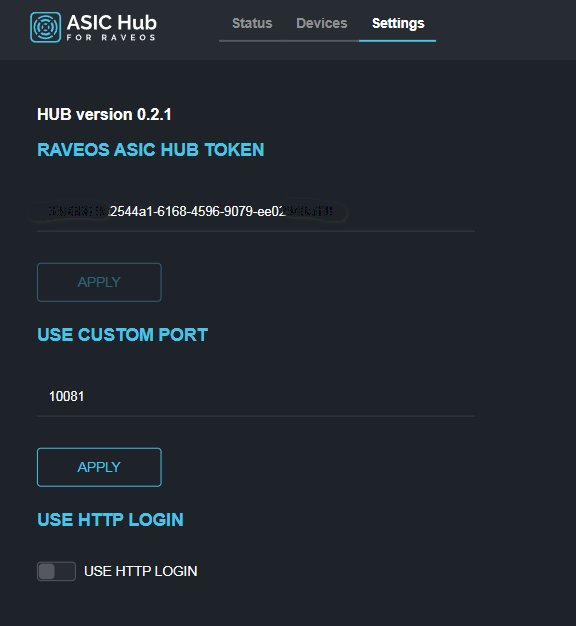
"Settings" Tab
- RAVEOS ASIC HUB TOKEN: The token for ASIC Hub. It can be changed to another token, but in doing so, the associated ASICs will be removed and need to be added again
- USE CUSTOM PORT: Change the default port 10081 to another port. This is useful when you need to create multiple ASIC Hubs under a single account. You change the port on the current ASIC Hub, then duplicate the folder "C:\ASIC Hub for RaveOS" with a new name, and the new ASIC Hub will run on the default port 10081. To access the old ASIC Hub, you will need to use the new specified port: "http://localhost:new_port/"
- USE HTTP LOGIN: Enable setting a login and password for ASIC Hub. By default, authentication is disabled

Creating Multiple ASIC Hubs on a Single PC
You can create multiple ASIC hubs on a single computer (server). This is useful when you have a large number of devices or want to distribute them across rooms, clients, or models.
Here's how you can do it:
- Start by installing the first ASIC hub following the instructions at the top of the page
- Then go to the "Settings" tab and change the port to another number, for example, 10082. Save the changes and restart the hub
- Next, copy the "C:\ASIC Hub for RaveOS\asichub" folder with a new name, such as "asichub1". Launch the new ASIC Hub using the "asichub.bat" file from the new folder. The second hub will run on port 10081
- To access the first (old) ASIC Hub, you will need to use the new specified port in the browser's address bar: "http://localhost:new_port/"
Now you will have the ability to manage multiple ASIC hubs on a single computer.