F. A. Q.
You can upgrade the system by running the upgrade
(upgrade -b latest for 1.0.24 or older versions) command on your rig. The latest version is available at raveos.com (mirror).
For a correct update, we recommend using the following sequence of actions:
- Stop mining (Actions-Pause)
- Restart the worker (Actions-Reboot)
- Update with the upgrade -b command (after a successful update, the rig will automatically restart)
- Start mining.
-
Please review the minimum system requirements, check your hardware for malfunction, and ensure your BIOS setting is set to recommend.
Minimum System Requirements- Intel® Core™ 2 or better / AMD am3+ or better
- 4GB RAM*
- 4GB drive (HDD/SSD/M2/USB)
- Intel® Core™ i3-3220 3.3 GHz / AMD FX-6300 3.5 GHz
- 8GB RAM
- 8GB SSD drive
Update the BIOS to the latest version!
- Disable CSM (for motherboards on the AMD platform, first disable CSM, save the settings, reboot, and only then configure everything else)
- Set the boot mode to UEFI
- Enable 4G decoding*
- Set the PCI Mode parameter to Auto**
- Turn on the integrated graphics and set the memory allocation value for it as small as possible
- Set the boot priority for HDD/SSD/M2/USB depends on your OS storage***
- Disable virtualization
*AMD A-series APU processors do not support 4G decoding
**if there are problems with starting a large number of GPUs, set the PCI Mode value to Gen1 or Gen2 and disable unused resources (audio outputs, etc.)
***When using HDD/SSD/M2, set the SATA operation mode to AHCI
-
Change your USB port. If it's connected to a USB 3.0 port (blue), change it to USB 2.0 (black)
- Download the image again and reflash it (the image may have been corrupted during boot) or use a different media drive.
Please notice: Api functionality is only available for paid tariff plans.
Here you can find all the documentation.
- Settings. Too much overclocking or undervolting (or custom bios with wrong settings). Try to low your overclock values. If you have custom bios then check if flashing the original one will fix the problem.
- Bad riser. Low-quality risers are very common in causing many problems. Change the riser or use better ones and see if that will help. Try checking GPUs one by one. Maybe one of them is causing problems.
- Power supply. A sudden stop or restart may be caused by a weak power supply. If the room temperature is too high, the power supply may overheat and simply turn off.
Login: root
Password: admin
* Managing the system via console is a risky business. Please use
help command after connecting to your rig to get a list of available commands. Make sure you understand the subject before applying any changes.To change the default password, please use
passwd command and follow the instructions.
To download VBIOS, you need to go to the Hardware tab of your риг, open the menu in the BIOS column and click [Get]. It will start the process of creating a download link. If the link is successfully generated, the Download icon in the BIOS column will turn blue. You can download VBIOS by clicking on it.
To upload VBIOS, you need to go to the Hardware tab of your rig, open the menu in the BIOS column, click [Upload] or [Force upload] and select a new VBIOS file. The rig will restart after the download process is complete.
Some antiviruses have their own web shield, it also may cause that kind of problem.
RaveOS is a live system, so logs are not saved after a reboot. You can view the current ones at the path /var/log/app/...
To enable saving logs after a system reboot:
- run the
log-oncommand in the riga terminal. - restart the rig.
You can find and view the saved system logs at /appdata/logs/... After fixing the errors, we recommend turning off saving with the logoff command
- Add them to /app-data/scripts. If there is no directory, create it by yourself.
- Scripts must be init.d format. The script name must starts with S. Example: S01user_script.sh
-
Grant the script execution rights.
Example:chmod +x /app-data/scripts/S01user_script.sh - IMPORTANT! The script should not block the thread.
a. HTTPS disable (trouble downloading miners issue)
- Go to Account-Configuration menu
- Switch to disable HTTPS.
Reapply Mining task on the worker after changing.
b. Most likely, there was a problem with the media markup during flashing. Check the amount of free disk space on the System Info tab. If you see that the total volume is about 500MB follow these steps:
- Stop mining on your device (Action-Pause)
- Run the command on your rig Console:
resize-os
After the worker restarts the “Free disk space” should display the correct media volume value. Miners and updates will be downloaded correctly.
For older versions, use the following sequence of actions:
- Stop mining on your device (Action-Pause)
- Run the command:
curl-s https://image.raveos.com/tools/fix-disk-step1.sh | /bin/sh -s - Wait for the device to reboot
- Run the command:
curl -s https://image.raveos.com/tools/fix-disk-step2.sh | /bin/sh -s - Wait for the device to reboot
No. To use the new version of the miner, just add it for the coin in your wallet.
Wallets - Edit Wallet - Edit Coin - Please select miner.
Add the miner. After that, you can select it from the list in the Mining section on your rig’s page.
To set additional parameters for the miner, go to Wallets - Edit Wallet - Edit Coin - Please select miner.
Click on the pencil icon next to the miner, you are interested in. Enter the parameters. Example: -parameter 1
Save the changes in the form and for the coin.
There are NO other official repositories.
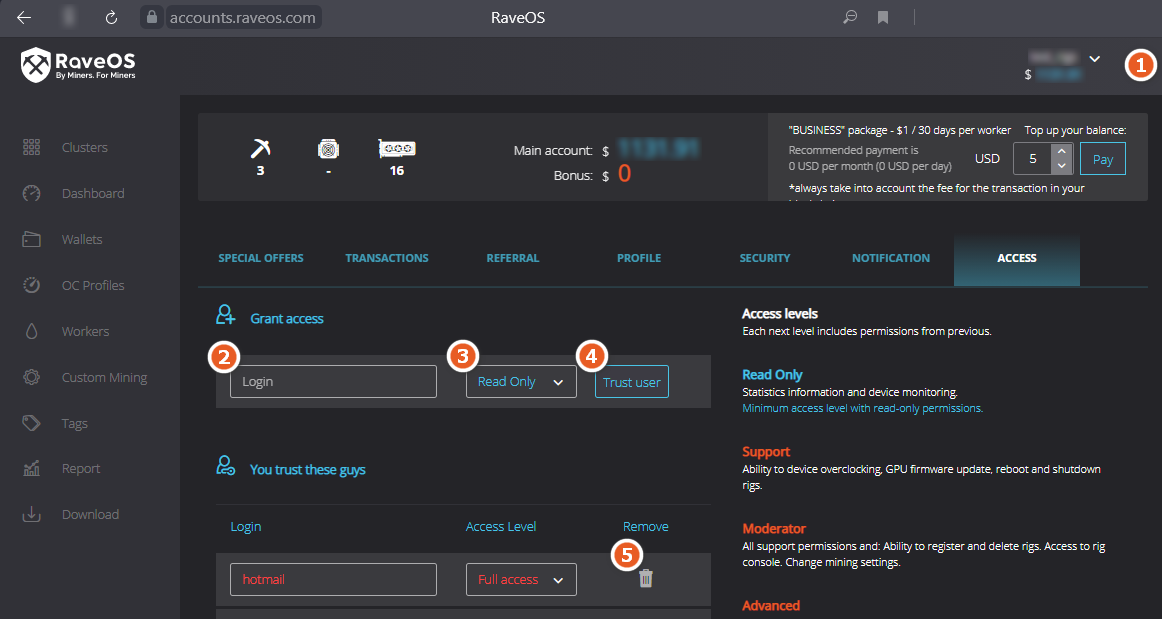
Go to the Account section. The icon in the upper-right corner on the dashboard.
- Go to the Grant Access tab
-
Enter your partner's username to the Grant Access field, select the appropriate access level (description of access levels on the right) and click Trust user.
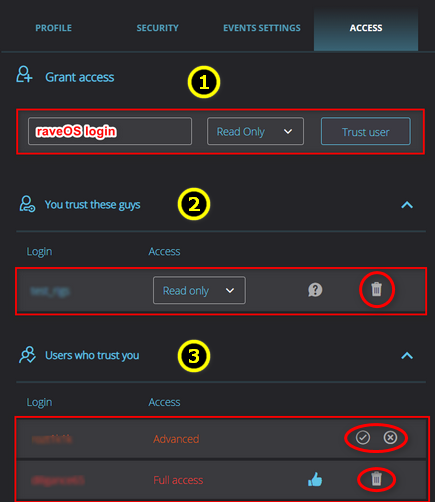
- You will receive an email confirming the granting of access. Confirm the action.
- Your partner will receive an email with a notification about granting access and must also confirm this action. The user who manages your account can delete the account from the list of Users who trust you at any time.
Explanations of the designations:
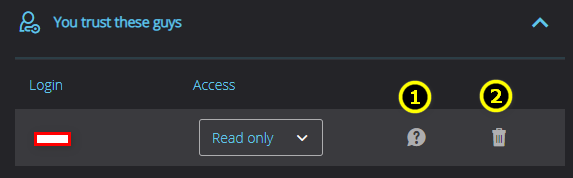
- This is the status 'waiting for confirmation', the user who has been granted access has not yet accepted the request.
- Cancel granting access.
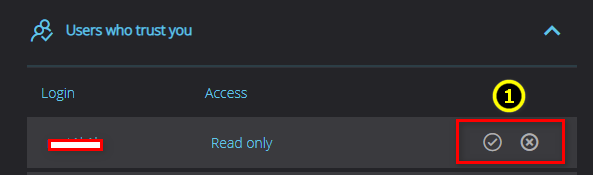
- Confirm or cancel the granted access.

After confirmation by the user, the one who granted access will see the status 'OK'
This feature is disabled for free users.
If you have one active worker (FREE tariff plan) and you want to use Grant Access feature, you can enable PRO features in Finance menu, Tariff Plans Tab.
Press ENABLE PRO FEATURES.
Attention!
Enabling is currently a permanent condition. You will not be able to switch off the PRO features for your FREE account.
cat /sys/class/thermal/thermal_zone0/temp | sed -e 's/\(..\)\(.*\)/\1.\2/'
Go to Workers menu or to the System Info tab on your worker.
Press [Transfer] button. Enter your partner's login and click [Send worker].
The worker will be transferred with all settings.
You will receive an email to confirm/cancel the transfer. If canceled, the worker will remain on your account.
After your confirmation, the partner will receive a confirmation request by mail and should also confirm/cancel the worker transfer.
In case of cancellation, the worker will remain on your account, if confirmed, it will be transferred completely to the partner's account.
Attention!
You will not be able to transfer this worker to other accounts for 3 days.
Unfortunately not all wireless adapters are supported in the system. You can view the list of available drivers by running the find /lib/modules/$(uname -r)/kernel/drivers/ -iname "*.ko" | grep wireless
Command for ethernet adapters:
find /lib/modules/$(uname -r)/kernel/drivers/ -iname "*.ko" | grep ethernet
We recommend to use a wired connection.
No.You can use a router with USB modem support to organize Internet access for your devices
Go to Account settings to PROFILE tab and press Delete Account.
To remove your account, please follow the confirmation link from the e‑mail. The email was already sent to your email account.
Please notice, that account information will be in pending status for the next 14 days and after that will be removed completely automatically. To cancel that process, please log in using your current credentials.
Important notice! You need to disable all of your online Workers (RIGs) before the account will be deleted to avoid extra charging.
If you did not send the request, then for security reasons, we recommend changing the password on your RaveOS account and your email.
We also recommend sending a response to the letter with the information "I did not order a password change".
To restore 2FA, you need the code that was provided to you at the time of activation of 2FA. If you lose this code, you should contact us at [email protected] specifying detailed information about the account: a list of rigs, cards, approximate registration date, balance account.
List of available terminal commands
help - list available commands
net - configure network interfaces
auth - set/change worker id and/or password
status - show worker status
restart - reboot worker
shutdown - shutdown worker
rds [sec] - reboot worker with delayed start (default timeout 60 seconds)
miner - show miner
stop - stop miner
start - start miner
log-on - enable system log writing directly to your drive
log-off - disable system log writing directly to your drive
swap-on - enable swap
swap-off - disable swap
list-tz - list of time zones
set-tz - setup worker time zone
clear-miners - remove all miners
clear-logs - remove all miner logs
fix-fs - check and try fix filesystem
crs-on - enable CRS (PCI large BAR)
crs-off - disable CRS (PCI large BAR)
resize-os - expanding disk partitions to use all the available disk space
upgrade ["version or os_build-app_build"]
(default: latest) - system update. Example: upgrade, upgrade "latest", upgrade "1.0.25", upgrade "8666-1952"
trm-mode - command for editing kernel boot parameters for Team Red Miner. Arguments: R - R mode, C - C mode, reset - reset to the default. Example: trm-mode R
amd-opencl-20.40 install - OpenCL (PAL) driver installation from driver package 20.40 for AMD Vega/Navi/BigNavi cards. ‼️Recommended only for those miners that do not support OpenCL ROCm drivers. For example, Lolminer does not support ROCm for Vega cards
amd-opencl-20.40 uninstall - removes OpenCL (PAL) driver from driver package 20.40 for AMD Vega/Navi/BigNavi cards
coolbox-flash [path_to_firmware] - updates Coolbox autofan firmware. Example: coolbox-flash /tmp/m328p_1031_1153_mem.hex
fan-check - re-initialize Coolbox and Donnager autofans
You need to save the changes on the form and on the Tuning tab after entering the data in SET. Click Save button for it. Use the Save&Apply button to apply the entered changes and restart mining.
Attention! oc -sleep ... and oc ... - these are two different commands. Each command must be entered from a new line.
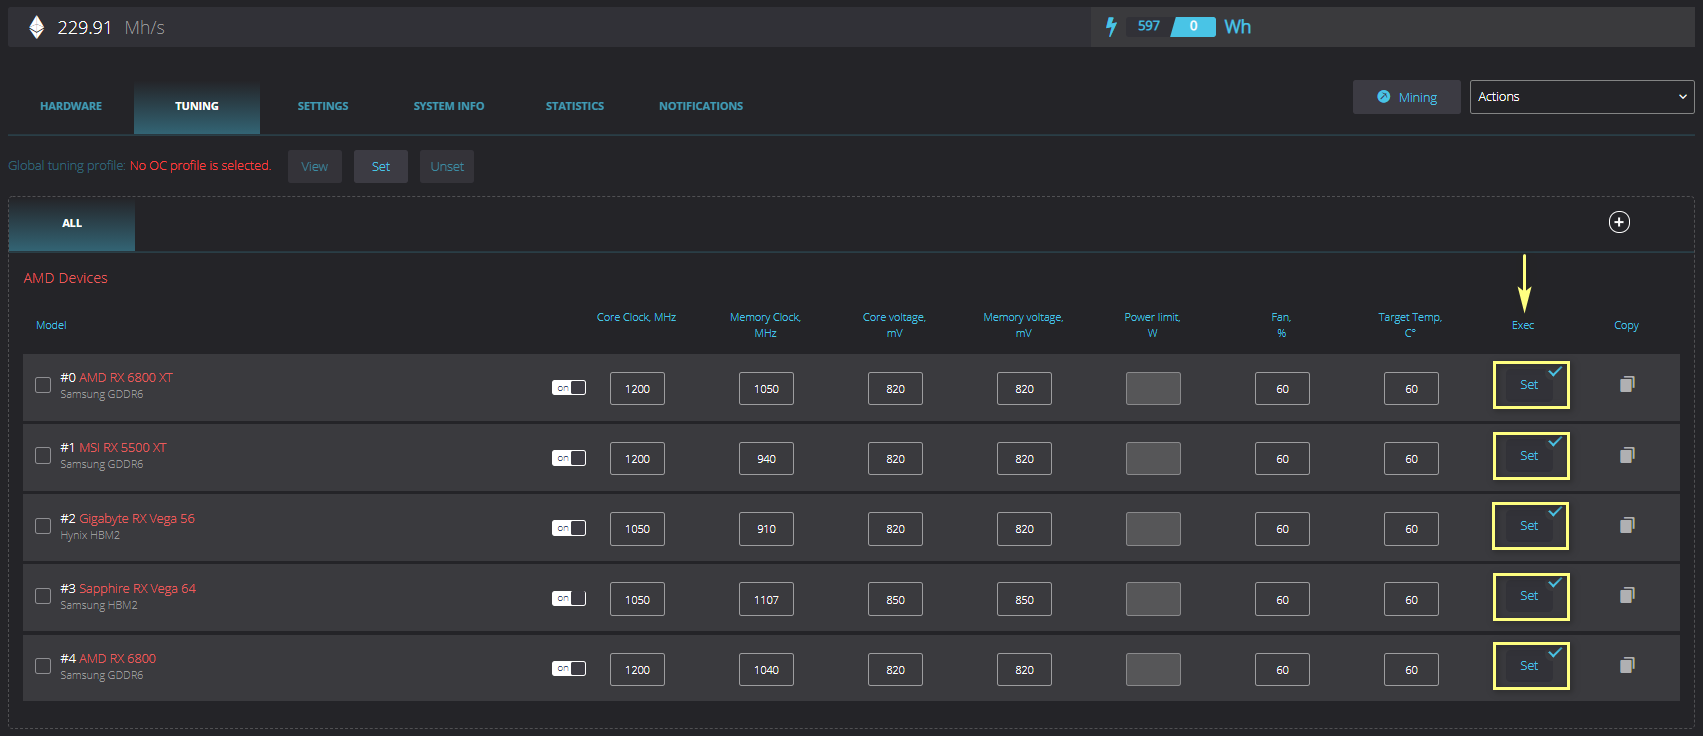
Functionality of the overlock oc
You can apply an overclock out via the Execute field. (Set button on the Tuning tab):
Example: oc -cclk=1070 -mclk=2050 -cvddc=780 -mvddc=800 -tt=65 -fan=80
The command must always start with oc. The oc parameter in SET must be only one
Available arguments for "oc ...":
-fan= - Fan speed (if the autofan is turned off). Example: -fan=80
-fanmin= - the minimum allowed fan value when the autofan is turned on. Example: -fanmin=0
-fanmax= - the maximum allowed fan value when the autofan is turned on. Example: -fanmax=100
-tt= - Target temperature (if autofan is enabled). Example: -tt=65
-ttm= - Target memory temperature (if autofan is enabled). Works for AMD Vega/Navi chips and Nvidia GDDR6X GPUs. If set different from 0, -tt is ignored! Example: -ttm=80
-wh= - Watchdog by hashrate at the GPU level (h/s). Example: -wh=30000000 (30Mh/s)
AMD only
-cvddc= - Core voltage in mV (AMD only). Example: -cvddc=800
-mvddc= - Voltage of the memory controller in mV (AMD only). Example: -mvddc=800
-socvddmax= - Maximum SOC voltage in mV (only for Navi10, Navi14). Example: -socvddmax=800
-gfxvddmax= - Maximum GFX voltage in mV (only for Navi10, Navi14). Example: -gfxvddmax=800
-socclkmax= - Maximum SOC frequency in Mhz (only for Navi10, Navi14). Example: -socclkmax=800
-gfxclkmax= - Maximum GFX frequency in Mhz (only for Navi10, Navi14). Example: -gfxclkmax=800
-lp=1 - Reduces consumption on AMD RX 6xxx series by 20-30W (only for Navi21, Navi22)
NVIDIA only
-cclk= - Core frequency in Mhz (for Nvidia - frequency offset). Example: -cclk=100
-mclk= - Memory frequency in Mhz (for Nvidia - frequency offset). Example: -mclk=1000
-pl= - Consumption limit in watts (only for Nvidia). Example: -pl=100
-fixclk= - Sets a fixed core frequency on the 16th, 20th and 30th Nvidia series (Experimental option! In some cases, it may help reduce consumption). Example: -fixclk=800
-fixpstate=1 - Disable the switching of CUDA and OpenCL drivers to the PState2 mode. Analogous to the option CudaForceP2State=off on Windows in Nvidia Inspector app. !!ATTENTION!! Global setting, applied to ALL maps (Experimental option! Enables the ability to set higher memory frequencies)
-led= - controls the logo illumination on some Nvidia cards. Default: 0. Valid range is 0-100. Example: -led=0 (off)
Delayed overclock oc -sleep
In order to use this function, you must specify in Set: oc -sleep=X …
where X is the quantity of seconds after starting the miner after which the parameters will be applied
The command should always start with oc -sleep=X. The oc -sleep=X parameter in SET must be only one
Example: oc -sleep=100 -cclk=1070 -mclk=2050 -cvddc=780 -mvddc=800
Available arguments for "oc-sleep ..."
-sleep= - The number of seconds after starting the miner, after which you need to apply the overclock.
Example: -sleep=120
AMD only
-cvddc= - Core voltage in mV (AMD only). Example: -cvddc=800
-mvddc= - Voltage of the memory controller in mV (AMD only). Example: -mvddc=800
-socvddmax= - Maximum SOC voltage in mV (only for Navi10, Navi14). Example: -socvddmax=800
-gfxvddmax= - Maximum GFX voltage in mV (only for Navi10, Navi14). Example: -gfxvddmax=800
-socclkmax= - Maximum SOC frequency in Mhz (only for Navi10, Navi14). Example: -socclkmax=800
-gfxclkmax= - Maximum GFX frequency in Mhz (only for Navi10, Navi14). Example: -gfxclkmax=800
NVIDIA only
-cclk= - Core frequency in Mhz (for Nvidia - frequency offset). Example: -cclk=100
-mclk= - Memory frequency in Mhz (for Nvidia - frequency offset). Example: -mclk=1000
-pl= - Consumption limit in watts (only for Nvidia). Example: -pl=100
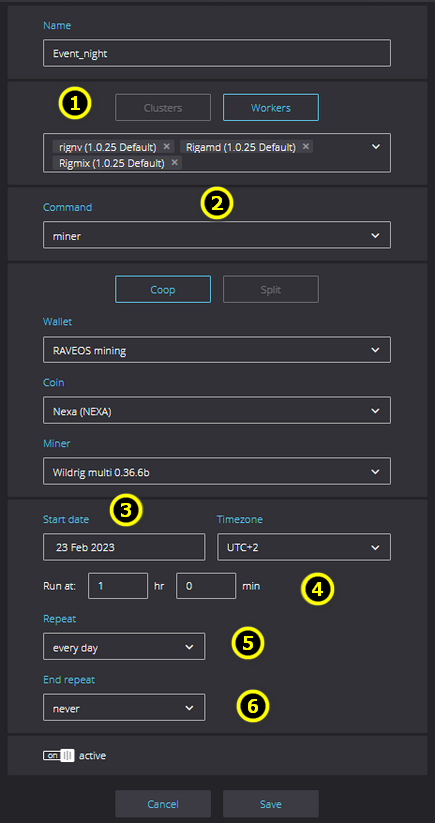
To create the rule with the specified parameters, follow these steps:
Press the "Add rule" button in the Scheduler menu.
- Type the Rule name. Choose either the "workers" or "clusters" option and select the workers or clusters you want to run the rule on.
- Select the command you want to run, such as "miner", "stop", "reboot" or "shutdown".
- Select the Start date and set the Timezone according to your location.
- Run at. Set the specific time of day you want the rule to start running.
-
Set Repeat options: Choose how often you want the rule to repeat, such as once, daily, or weekly (with checkboxes for selecting specific days).
Examples:
- "weekly" with Monday and Wednesday selected means the rule will run on those two days each week.
- Set End repeat options: Choose when you want the rule to stop repeating, such as never, after a certain number of times, or on a specific date.
Once you have created the rule, you can edit it, copy it to create a new one, remove it, or turn it on/off as needed.
Limitations for the number of rules in the scheduler:
FREE tariff - 5 rules, PRO tariff - 10, ENTERPRISE tariff - 20.
An increase in the number of available rules can be requested via [email protected]
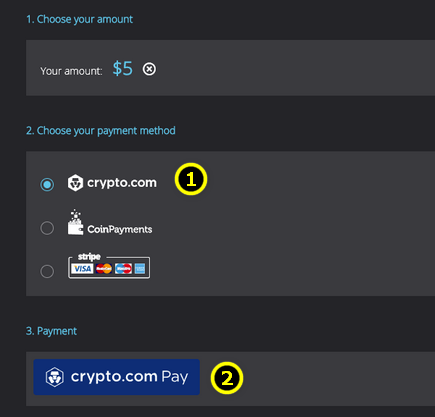
- Choose Crypto.com payment method.
- Press Crypto.com PAY button.
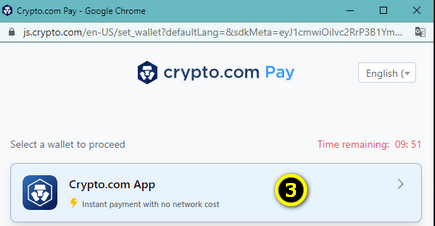
- Select Crypto.com App.

- Scan QR-code with Crypto.com App ( Open Crypto.com App and Hit 'Pay' button.)
- Then follow the instructions in the mobile app.
Go to the Finance menu (left sidebar), press [Pay] button on the Overview tab or go to ADD CREDIT tab. Choose your deposit amount or enter it in the Custom field (min $1).
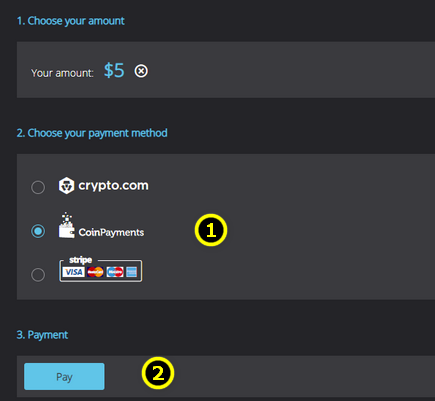
- Select Coinpayments payment method (Pay with crypto)
- Press pay.
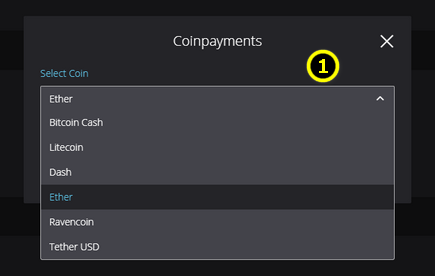
- Select a coin. Don't use ETH for micropayments. We advise you to convert your cryptocurrency and use coins with a low commission (USDT,LTC, RVN). Also, always consider the commission of your wallet or exchange. To pass successfully, an amount equal to the billing amount must come to the Coinpayments account here

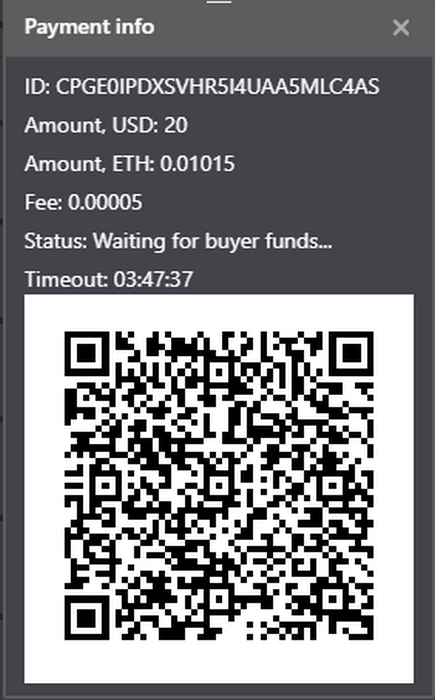
- Copy the wallet address or scan the QR code to pay
- Your Payment ID (may be required if there is a problem with the payment), you can check the status of the payment using the link
- Total amount you need to send.
*Please, pay attention to add the transaction fee of your blockchain to the required amount when your pay in cryptocurrencies.
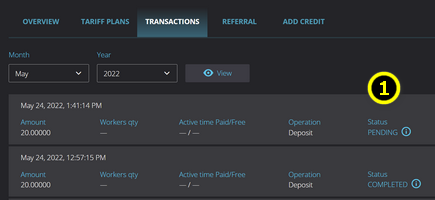
- You can check the payment status in the menu Finance - Transactions by clicking on the icon ( i )
In case of success or timeout, you will receive a letter to your email. After its Complete, your balance will be filled after 10-15 minutes.
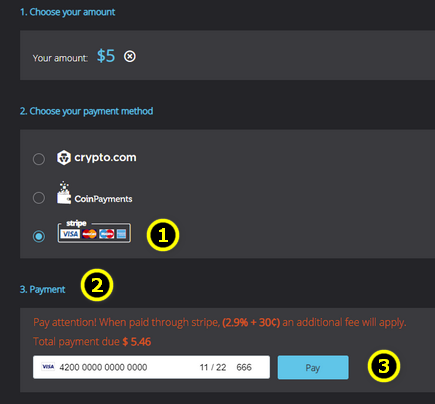
- Choose Stripe payment method.
- Type your credit card credentials.
- Press the Pay button. Check your commission carefully before paying.
The most common problem for users is commission coverage. It depends on your exchange or wallet. Make sure that you pay the amount indicated in the invoice plus your wallet or exchange commission.
Use the link in the email from Coinpayments to check the status of your transaction. If you paid without commission, you can see something like this:
“Waiting for confirms... (97 / 100 received with 1 confirms)”
This means that 97 out of 100 coins were received for payment in Coinpayments. Now you need to decide what to do:
- Pay the shortfall. You can pay to the same account by covering the missing amount (100-97).
- Wait for a refund. Money will be refunded when the payment is canceled, usually within 24 hours. You can simply create a new payment taking into account the commission.
If you still have questions about payments, you can mail us [email protected].
In the letter, specify:
- Payment ID (C ...) received from Coinpayments earlier via email
- Link to blockchain transaction or transaction number
- Your RaveOS account name